
Share this
by Hyde on Jan 11, 2022, 4:31:00 PM
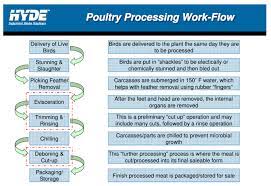
Modern poultry processing moves birds through a controlled series of stages, from receiving and slaughter through packaging and cold storage. The handling at each stage affects food safety, product quality, yield, and production efficiency.
If you manage the operations or maintenance of a poultry processing facility, you should pay close attention to cutting performance. Industrial blades handle many of the most important tasks on the poultry production line, so blade condition and design greatly affect how smoothly the process runs.
Step 1: Receiving, Stunning, and Slaughter
The poultry slaughter process begins when live birds arrive at the plant. Careful receiving and handling reduce stress, bruising, broken wings, and other damage that may lower carcass quality.
Birds then move into shackles or a similar handling system where they are stunned. Methods include electrical or gas-based stunning to render birds unconscious. Stunning reduces avoidable pain and distress during slaughter. After stunning, cutting equipment severs major blood vessels so the bird bleeds out.
Stable line speed and reliable poultry-processing equipment are important at this step. Variation during receiving and slaughter can damage carcasses or create other downstream issues.
Step 2: Scalding and Feather Removal
The bird carcasses enter the scalding stage next. Submerging them in hot water affects the tissue around the follicles, loosening the feathers and making them easier to remove. Processors control the water temperature and ensure adequate exposure time, while carefully not scalding the birds excessively, which could change skin appearance and texture.
Carcasses then move through picking equipment, where rotating rubber “fingers” rub against each bird to remove the loosened feathers. Proper scalding allows the picker to work with less force, reducing the risk of torn skin.
Good process control during these early steps prepares each carcass for the cutting operations that follow. Any remaining feathers, damaged skin, or inconsistent positioning may interfere with evisceration and trimming equipment. Well-controlled scalding and picking keep the rest of the line running smoothly.
Step 3: Evisceration, Trimming, and Inspection
Evisceration is the process of opening the body cavity and removing the internal organs. This calls for limiting contact between edible tissue and digestive contents. Precise cuts around the vent and abdomen prevent damage to the intestinal tract and decrease the risk of contamination.
Trimming removes the head, neck, feet, and hocks. Edible giblets may be separated for further processing.
Next, carcasses move through inspection. In federally inspected U.S. plants, USDA inspectors examine each carcass for signs of disease, contamination, and other conditions that could make it unfit to eat. If an issue is limited to one area, trimming equipment may remove the affected tissue so the rest of the carcass can continue down the line.
Clean, accurate cutting is particularly important at this stage. If the condition makes the meat unfit, the entire carcass is condemned and removed from production.
Common Cutting Operations During Evisceration
Evisceration requires several different cuts, so there isn’t one blade style that works for everything. Some cuts need a sharp, precise edge, while others must get through tough connective tissue. Matching the appropriate poultry processing knives to the job promotes clean cuts, protects usable meat, and keeps production moving forward.
The types of cuts performed on this part of the line include:
- Vent cutting: A sharp, properly sized scalloped or serrated blade makes a controlled cut around the vent for clean removal of the digestive tract.
- Opening cuts: A specialized machine blade creates the abdominal opening that gives evisceration equipment access to the body cavity. The blade needs a sharp, controlled edge to open the carcass without cutting deeper than necessary.
- Head cutting: A circular blade removes the head quickly, cleanly, and at a consistent point along the neck.
- Feet cutting: A circular or specialty blade separates the feet at the joint before the carcass moves farther into processing. The exact blade configuration depends on the machine and cutting setup.
- Hock cutting: A scalloped, toothed, or arcuate-edge blade works through joints, tendons, and connective tissue. These blades have an edge that bites into the material without slipping for a clean, controlled cut.
Step 4: Chilling and Food Safety
Once evisceration and inspection are complete, the carcasses need to be quickly cooled. Chilling lowers the temperature to slow microbial growth and protect quality. Most poultry plants use one of these approaches:
- Immersion chilling: Carcasses travel through tanks of cold water and ice, where direct contact with the water cools them quickly. This method works well for high-volume poultry processing. However, it requires careful monitoring of water temperature, sanitation, and water retention.
- Dry-air chilling: Carcasses move through a refrigerated chamber. Compared to immersion systems, the birds absorb less moisture and come out with a drier surface, but the process requires more space and chilling time.
- Evaporative air chilling: This method combines cold air with a fine water mist. As moisture evaporates from the carcass, it pulls away heat, speeding up cooling while using much less water than full immersion chilling.
No matter the method, consistent chilling is necessary to preserve food safety and maintain regulatory compliance. It also prepares each carcass for reliable downstream cutting.
Step 5: Deboning, Cut-Up, and Portioning
Once chilled, carcasses are broken down into their final products. Steps may include separating the birds into different cuts, deboning breasts and thighs, and removing skin and connective tissue, often grouping like cuts together.
These cutting, deboning, and portioning steps demand a lot from custom meat-cutter machine blades. For the best results, blade design must match the cut and your machine setup. A well-designed edge makes cleaner cuts, keeps more usable meat on the finished portion, and requires less cutting force. This reduces equipment wear, extends blade life, and reduces unnecessary downtime.
Why Blade Performance Matters During Cut-Up
Sharpness affects the force required to complete the cut. A sharp edge separates tissue cleanly for the best appearance and the most usable meat.
Durability impacts how long the blade retains its edge. Poultry blades face constant cutting and frequent washdowns, so the right material and edge treatment are necessary for a longer blade life and fewer change-outs.
Geometry is important, too. Bevel angle, thickness, curvature, and serration determine how the blade enters the product and handles resistance. Effective food-cutting blade design matches the edge to the precise cutting task.
Step 6: Packaging and Production Efficiency
The final stage of production involves quality checks and poultry packaging. Depending on the product and shipping method, this step may involve trays, bags, vacuum packaging, or modified-atmosphere packaging.
From there, packaged poultry moves into refrigerated or frozen storage to keep it at a safe temperature. Final checks and processing include verifying package weight, checking seal quality, placing labels, and detecting foreign materials.
Efficiency at this stage depends on how smoothly everything went upstream. Worn blades and uneven cuts slow production, create rework, and cause problems during packaging. Tracking edge condition, replacing blades on schedule, and stocking the right spares makes these disruptions easier to avoid.
Keep Your Poultry Processing Line Moving
Hyde Industrial Blade Solutions is a family-owned company with over 150 years of blade-manufacturing experience. We produce industrial blades and knives in the U.S. for demanding food-processing applications, with better reliability than our foreign competitors. We partner with processors to handle OEM replacements, custom geometries, and cutting problems that affect yield or uptime. Contact us today to discuss the right blades for your application.
FAQs
What are the main stages of poultry processing?
The main poultry processing steps are receiving, stunning, and slaughter; scalding and feather removal; evisceration and inspection; chilling; deboning and cut-up; and packaging for cold storage or shipping.
What is the purpose of chilling during poultry processing?
Chilling lowers carcass temperature to slow microbial growth and support food safety. It also preserves product quality and prepares poultry for further processing and storage.
How do industrial blades improve poultry processing efficiency?
Properly engineered blades improve poultry processing efficiency by making clean, consistent cuts, which reduces wasted meat and unnecessary cutting force. They also have a longer edge life for fewer blade changes and more reliable throughput.
What factors should processors consider when selecting poultry processing blades?
To choose optimal poultry processing blades, consider blade material, corrosion resistance, edge retention, sanitation requirements, and anticipated wear. For the best results, blade geometry should also match your machine, product, and cutting application.